Deploy via PXD
PXD is the deployment tool for PolarDB-X. In addition to supporting the one-click rapid setup of a testing environment locally, it also supports deploying PolarDB-X distributed databases in a Linux cluster using a specified topology.
System Configuration
- Ensure that each machine has a disk space of >= 100GB, with SSDs recommended for the disk type.
- Disable the firewall on all machines.
- Install Docker on all machines in the cluster, refer to the documentation: https://docs.docker.com/engine/install/
Note: In cluster mode, the Docker engine version needs to be greater than or equal to 18.04.
After installation, verify with the command
docker ps. If you encounter the following error: 'Got permission denied while trying to connect to the Docker daemon socket at unix:///var/run/docker.sock: Get http:///var/run/docker.sock/v1.26/images/json: dial unix /var/run/docker.sock: connect: permission denied'. Refer to: How to get docker permissions for non-root users - Configure passwordless login for cluster machines
If your machine has multiple network cards, to ensure the quality of the network, it is recommended to use the IP of the internal network card for password-less configuration, and not to use the public IP.
If your machine has multiple internal network cards, it is suggested to use the IP outputted by the hostname -i command for deployment. The output of hostname -i can be configured by modifying the /etc/hosts file.
# Generate key pair
ssh-keygen -t rsa

# Copy the public key to the target machine, modify user and IP
ssh-copy-id {user}@{ip}
Install PXD on the Deployment Machine
Choose any machine as the deployment machine, and install PXD on this machine. PXD will use the deployment machine to create the PolarDB-X database within the cluster.
Preparations
1.Install Python3
If Python3 is already installed on your machine, you can skip this step.
Check with the command: which python3, if there is a return, Python3 is installed.
Red Hat, CentOS or Fedora:
yum update -y
yum install -y python3
Debian or Ubuntu:
apt-get update
apt-get install python3.7
2.Create a Python3 virtual environment and activate it
python3 -m venv venv
source venv/bin/activate
It is recommended to use a virtual environment to install the PXD tool.
Install PXD
Before installation, it is recommended to upgrade pip with the following command:
pip install --upgrade pip
Install PXD with the following command:
pip install pxd
Note: Some users may experience slow downloads from PyPI. You can use the following command to install from the Alibaba Cloud mirror: pip install -i http://mirrors.aliyun.com/pypi/simple/ pxd
Prepare PolarDB-X Topology File
PolarDB-X currently includes two series: Enterprise Edition and Standard Edition. You can prepare the corresponding topology file according to your actual needs.
Prepare PolarDB-X Enterprise Edition Topology File
PolarDB-X Enterprise Edition is a distributed architecture cluster that supports larger data volumes, targeting business scenarios with enterprise-level ultra-high concurrency, large-scale data complex queries, and accelerated analysis. Write the following YAML file to specify the name of the PolarDB-X Enterprise Edition cluster and the deployment nodes of GMS, CN, and DN.
First,obtain the latest image tags for each PolarDB-X component with the following command:
curl -s "https://polardbx-opensource.oss-cn-hangzhou.aliyuncs.com/scripts/get-version.sh" | sh
The output will be as follows (taking PolarDB-X V2.4.0 as an example):
CN polardbx/polardbx-sql:v2.4.0_5.4.19
DN polardbx/polardbx-engine:v2.4.0_8.4.19
CDC polardbx/polardbx-cdc:v2.4.0_5.4.19
Then prepare 3 machines, for example: 10.168.0.37, 10.168.0.38, 10.168.0.39
- 10.168.0.37, deploy GMS and CDC nodes.
- 10.168.0.38, 10.168.0.39, deploy two CN/DN nodes each. In the dn section, the host_group represents the deployment machines of one dn node with multiple replicas. For example, for a Paxos three-replica cluster, you need to fill in three IPs.
If your machine has multiple network cards, to ensure the quality of the network, it is recommended to use an internal network IP in the YAML file, instead of a public IP.
If your machine has multiple internal network cards, it is recommended to deploy using the IP outputted by the hostname -i command. The output of hostname -i can be configured by modifying the /etc/hosts file.
version: v1
type: polardbx
cluster:
  name: pxc_test
  gms:
    image: polardbx/polardbx-engine:v2.4.0_8.4.19
    host_group: [10.168.0.37]
  cn:
    image: polardbx/polardbx-sql:v2.4.0_5.4.19
    replica: 2
    nodes:
      - host: 10.168.0.38
      - host: 10.168.0.39
    resources:
      mem_limit: 4G
  dn:
    image: polardbx/polardbx-engine:v2.4.0_8.4.19
    replica: 2
    nodes:
      - host_group: [10.168.0.38]
      - host_group: [10.168.0.39]
    resources:
      mem_limit: 4G
  cdc:
    image: polardbx/polardbx-cdc:v2.4.0_5.4.19
    replica: 1
    nodes:
      - host: 10.168.0.37
    resources:
      mem_limit: 4G
The PolarDB-X Enterprise Edition cluster is created using the above topology file. The topology file includes the following properties:
- version: Topology file version, no need to modify
- type: polardbx, no need to modify
- cluster.name: PolarDB-X cluster name
- cluster.gms.image: GMS Docker image name. Please fill in the DN image obtained from the above command. If not specified, the default will be the latest image.
- cluster.gms.host_group: GMS machine IP list. If you want to create a single replica mode, fill in one IP in the list. If you want to create a three-replica cluster based on Paxos, fill in three IPs. The leader node will be randomly selected from the first two IPs.
- cluster.cn
- image: Compute node image name, optional. Please fill in the CN image obtained from the above command. If not specified, the default will be the latest image.
- replica: Number of compute nodes, needs to correspond to the number of hosts in nodes.
- nodes: List of IP addresses of compute nodes.
- resources: Resources used by compute nodes
- mem_limit: Memory limit, default 2G
- cluster.dn
- image: Data node image name, optional. Please fill in the DN image obtained from the above command. If not specified, the default will be the latest image.
- replica: Number of data nodes, needs to correspond to the number of host_group in nodes.
- nodes: List of host_group of storage nodes. One host_group represents the deployment machine of one dn node with multiple replicas. For example, for a Paxos three-replica cluster, fill in three IPs. The leader node will be randomly selected from the first two IPs.
- resources: Resources used by storage nodes
- mem_limit: Memory limit, default 2G
- cluster.cdc
- image: CDC node image name, optional. Please fill in the CDC image obtained from the above command. If not specified, the default will be the latest image.
- replica: Number of CDC nodes, needs to correspond to the number of hosts in nodes.
- nodes: List of IP addresses of CDC nodes.
- resources: Resources used by CDC nodes
- mem_limit: Memory limit, default 2G
Note: If creating a three-replica cluster based on Paxos, pxd version must be >=0.3.0
Prepare PolarDB-X Standard Edition Topology File
PolarDB-X Standard Edition adopts a three-node architecture with one master, one standby, and one log, which is cost-effective. It ensures strong consistency of data through multi-replica synchronous replication. It is designed for online business scenarios with ultra-high concurrency, complex queries, and lightweight analysis.
Note: Standard Edition cluster creation depends on pxd version >=0.6.0
First,obtain the latest image tags for each PolarDB-X component with the following command:
curl -s "https://polardbx-opensource.oss-cn-hangzhou.aliyuncs.com/scripts/get-version.sh" | sh
The output will be as follows (taking PolarDB-X V2.4.0 as an example):
CN polardbx/polardbx-sql:v2.4.0_5.4.19
DN polardbx/polardbx-engine:v2.4.0_8.4.19
CDC polardbx/polardbx-cdc:v2.4.0_5.4.19
PolarDB-X Standard Edition has no CN, GMS, and CDC. It only has one DN node. Write the following YAML file to specify the name of the PolarDB-X Standard Edition and the topology information of the three nodes.
If your machine has multiple network cards, to ensure the quality of the network, it is recommended to use an internal network IP in the YAML file, instead of a public IP.
If your machine has multiple internal network cards, it is recommended to deploy using the IP outputted by the hostname -i command. The output of hostname -i can be configured by modifying the /etc/hosts file.
version: v1
type: polardbx
cluster:
  name: pxc_test
  dn:
    image: polardbx/polardbx-engine:v2.4.0_8.4.19
    replica: 1
    nodes:
      - host_group: [172.16.201.11,172.16.201.11,172.16.201.11]
    resources:
      mem_limit: 2G
The PolarDB-X Standard Edition cluster is created using the above topology file. The topology file includes the following properties:
- version: Topology file version, no need to modify
- type: polardbx, no need to modify
- cluster.name: PolarDB-X cluster name
- cluster.dn
- image: Data node image name, optional. Please fill in the DN image obtained from the above command. If not specified, the default will be the latest image.
- replica: Number of data nodes, set to 1 by default in the Standard Edition.
- nodes: List of host_group of storage nodes. One host_group represents the deployment machine of one dn node with multiple replicas. For example, for a Paxos three-replica cluster, fill in three IPs. The leader node will be randomly selected from the first two IPs.
- resources: Resources used by storage nodes
- mem_limit: Memory limit, default 2G
Create PolarDB-X Cluster
Execute the following command to deploy PolarDB-X with one click within the cluster:
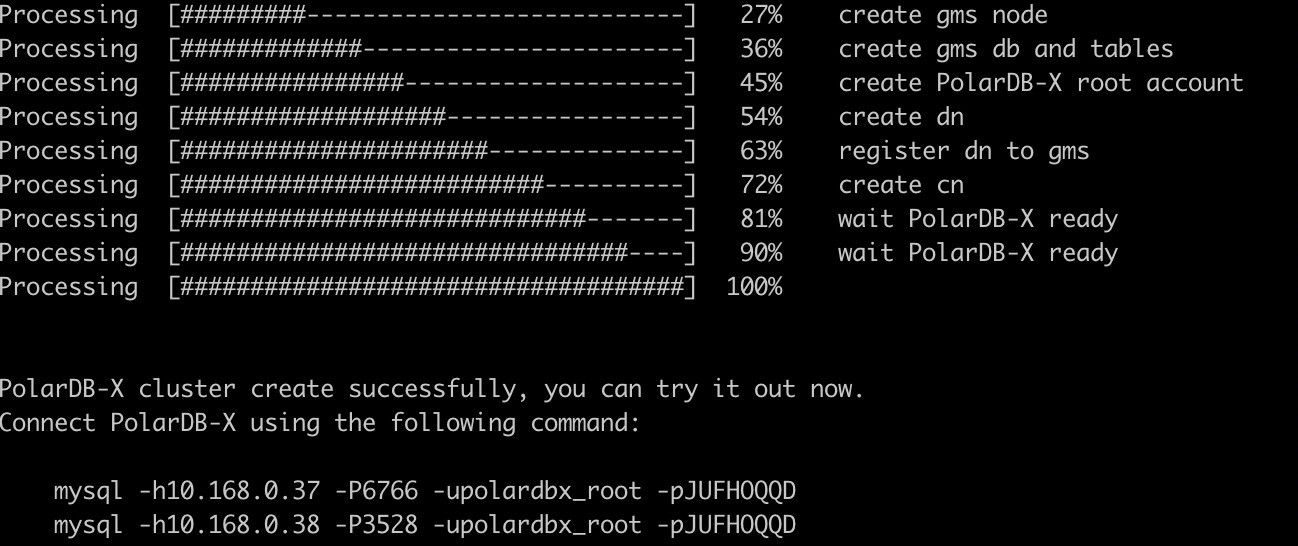
pxd create -file polardbx.yaml
After deployment, pxd will output the connection method of the PolarDB-X cluster. You can log in to the PolarDB-X database for testing using the MySQL command line.
Note:
- The password for the PolarDB-X administrator account is randomly generated and only appears once. Please remember to save it.
- PolarDB-X CN itself is stateless. In the Enterprise Edition, multiple CN nodes will be deployed, and any CN can log in to execute SQL. If load balancing is needed, you can provide a unified access address externally through a load balancing component (such as LVS, HAProxy, or F5).
You can connect via MySQL Client and execute the following SQL to experience the distributed features of PolarDB-X Enterprise Edition. For details on PolarDB-X SQL, please refer to: SQL Overview
Note: The syntax of PolarDB-X Standard Edition is exactly the same as MySQL, so experience SQL is not listed here.
# Check GMS
select * from information_schema.schemata;

# Create a partition table
create database polarx_example  mode=auto;

use polarx_example;

create table example (
  `id` bigint(11) auto_increment NOT NULL,
  `name` varchar(255) DEFAULT NULL,
  `score` bigint(11) DEFAULT NULL,
  primary key (`id`)
) engine=InnoDB default charset=utf8
partition by hash(id)
partitions 8;

insert into example values(null,'lily',375),(null,'lisa',400),(null,'ljh',500);

select * from example;

show topology from example;

# Check CDC
show master status ;
show binlog events in 'binlog.000001' from 4;


# Check DN and CN
show storage ;
show mpp ;
Check PolarDB-X Cluster Status
Execute the following command to check the status of the PolarDB-X cluster:
pxd list

Execute the following command to view more commands and usage of pxd:
pxd --help